USS Pavlic - APD-70 A History |
Hirohito Surrenders
War is Declared Over
August 15, 1945

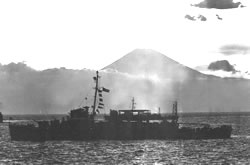
USS Pavlic refueling at sea
At 8:00 am word was received that Washington officially declared the war was over. Emperor Hirohito finally had accepted surrender terms. Our whole transport division was then en route to Honshu, Japan. We were joining the rest of the Third Fleet to participate in the surrender and occupation of Japan.
August 19,1945
Our transport division was refueling from the USS Cassetot (AO 77) as we were sailing up to Honshu, Japan. The picture (right) shows Pavlic refueling at sea from such a tanker. Sometimes there would be a ship on either side of the tanker taking on fuel. In the background you can see another APD waiting her turn to come alongside the tanker. The crew is hauling on the rope to haul one fuel line aboard. It appears the rear fuel line is already aboard, but the same technique would be used to keep it taut while fueling is taking place. It gets pretty chancy if the seas get too rough.
August 20, 1945
 HMNZS Gambia |
At 10:15 am we made preparations to load troops from HMS Newfoundland and HMNZS Gambia, two British Colony-Class cruisers. The troops were British and Australian/New Zealand Royal Marines (ANZACS was a term used at the time). We took aboard 15 officers and 155 enlisted men. I believe I was on watch at the time and didn’t actually witness the procedure. I believe the ship pictured (left) is the Gambia. In the picture below, you can see a man in a boson’s chair, suspended on a line between ships, just starting to be pulled across. I don't know how many men we took aboard this way. Most were brought over by our Higgins boats in a difficult mid-ocean transfer. We had them aboard for the next 11 days, which made for a pretty crowded ship. We got along fine but they certainly did a job on our deck paint with their hobnail boots while doing calisthenics. |
 Transferring troops from the |
 Transferring New Zealand troops |
August 28, 1945

APD'S in Sagami Bay, Japan,
28 August 1945.
Mt. Fuji in the background.
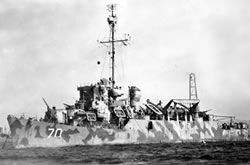
We anchored in berth 100 in Sagami Wan, Honshu, Japan, not far from the entrance to Tokyo Bay. The picture (right) of other destroyer escorts in our squadron was taken that evening.
To get a picture of the layout of the region I have added a rough map (below). To the left of the entrance to Tokyo Bay, a wider bay opens out which is called Sagami Wan, or Sagami Bay. This is where we were anchored as shown above with Mt Fuji in the background while we were waiting for orders to go into Tokyo Bay. At the right side of the initial entrance to Tokyo bay is a smaller bay shaped like a right angle, called Tateyama Bay, which I will discuss later. As you go up into Tokyo Bay, near Yokosuka there was a fort called Fort #4, and further on in the middle of the bay was an island fort called Fort #2.

August 30, 1945
At 4:59 am we got underway for Tokyo Bay with orders to neutralize Fort #4 and Fort #2, both on islands in Tokyo Bay. As we were entering Tokyo Bay and approaching Fort #4, close to Yokosuka Naval Base, all hands were at general quarters because no one knew how the Japanese were going to react. At 9:34 am two boatloads of British marines were under way for Fort #4. At 9:55 am we proceeded to Fort #2 on an island near the center of the bay. By 10:00 am we had word that Fort #4 was secured. By 10:16 am the other two boats were away with British marines to neutralize Fort #2, and we then anchored off Fort #2. The ship’s camera went in the boats to Fort #2. Hence we have no pictures of Fort #4.
 View of Island Fort #2
Tokyo Bay, |
 Preparing to land troops at Island Fort #2 |
 Surrender troops wait at the boat ramp |
 This Japanese surrender committee |
As the boats approached the island fort you could see the white surrender flag flying over it. There is also a small group of soldiers standing near the landing ramp with a surrender flag.
On landing at the boat ramp they found the four-man surrender committee waiting.

Royal Marines from HMNZS Gambia
or HMS Newfoundland at the dock
at Fort #2, Tokyo Bay, 30 August 1945

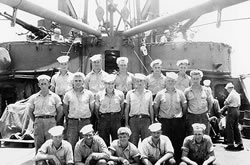
Pavlic landing party at
Fort #2, Tokyo Bay
L to R:
Kenneth Mizell EM 1/c, Clarence Franks MM 1/c,
James Smith S 1/c, Rocco Rossi GM 2/c,
Robert Lefebvre BM 1/c, Jack Wilfred SM 3/c,
Phillip Grissom MaM 3/c Ens. George Miller
In addition to the boat crews, Pavlic’s part of the landing party (right) was a group of volunteers, a mix of various ratings from gunner’s mate to signalman to mailman. When they had asked for volunteers, they got lots of responses, but not from me. With the war over, I thought it would be silly to risk a sniper’s bullet from some dedicated die-hard, unless there was a real need for me to get involved. Not pictured are our fellows in the boat crews, which also went ashore.
 Pictured left is the formal surrender ceremony in which the big surrender flag is being lowered. This was supposed to be a surrender to the British landing party. However, the Japanese were willing to surrender to the Americans, not to the British. Consequently there was a hurried boat trip back to the ship to get an American flag. Everything then went smoothly and US colors were raised over Fort #2 shortly thereafter.

Raising American flag, Fort #2,
Tokyo Bay, 30 August 1945.
(Japanese refused to surrender to the British.)
It wasn’t as dramatic as the raising of the flag over Iwo Jima, but it was probably one of the first formal surrender ceremonies in the Tokyo area.
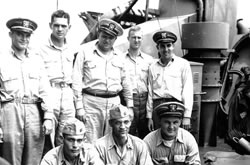
In the photo (right), the British marines are arrayed to the left, our landing party plus some of the guys from the boat crews on the right, and the Japanese with their backs to the camera. The British officer was the senior man and Ensign George Miller is a step or two behind him.

Our flag flying over Fort #2,
Tokyo Bay, 30 August 1945
The final result..................
Our flag flying over Japanese Fort #2
on Okinawa. August 30, 1945
![]() USS Pavlic - APD-70
USS Pavlic - APD-70